I may earn from purchases through links in this post.
After fielding questions from a number of friends about where to begin with making cocktails, I’m starting a series that will walk you through the basics. Today, I’m starting with the basic equipment you need to make most drinks.
Maybe you haven’t had a cocktail since that bad experience with tequila poppers in college. Maybe you’ve spent your adult beverage time visiting microbreweries or vineyards to learn about beer or wine. Maybe you don’t do alcohol (that’s fine, try a shrub).
But maybe you’ve caught wind of this cocktail renaissance that’s been slowly building for the last decade or so, and maybe you’ve even visited a bar that specializes in hand-crafted pre-Prohibition drinks, but you haven’t tried making a drink like that at home.
You google a manhattan recipe, pull out that three-piece cocktail shaker that’s been gathering dust in the back of the cabinet you never use, add some sweet vermouth from an equally dusty bottle you found there along with some bourbon and a few ice cubes, and give it a good shake. Then you try to pry open the lid, and, wow, it’s really stuck on there.
That’s because most of those three-piece cobbler shakers that so many of us have, to put it bluntly, suck. If you shake a drink long enough to make it cold, the lid freezes shut, and no amount of tugging and cursing will change that.
Luckily, the right equipment will. Even luckier, the right equipment is pretty cheap, and you don’t need that much if it to get started.
Alright, Mary, what do I need? I’m glad you asked.
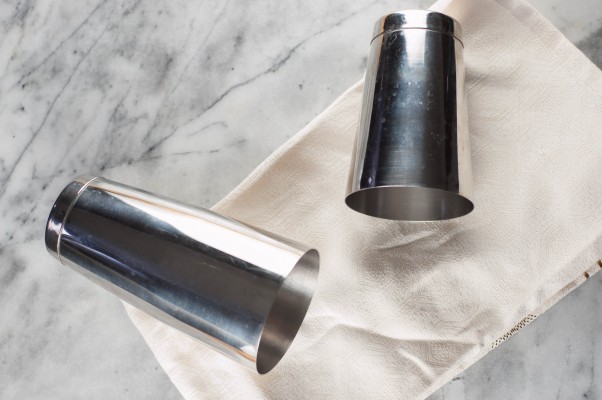
1. A Boston Shaker. Or my preference, the all metal version of a Boston shaker, a set of weighted mixing tins, like this tall and short
set. They’ll set you back about $17 and last forever and unlike their three-piece brethren, they don’t freeze shut. The short one sits in the tall one, and if you give it a good smack after you’ve added ice, you’ll feel it seal tightly. The height allows your drink plenty of room to move as it shakes. They pretty much last forever, and you can use it as a mixing container for your stirred drinks as well (I’ll be covering shaking and stirring later). If you want, you can shell out for a pretty mixing glass
, but the purpose of a mixing glass is mostly aesthetic, and these tins, or any sturdy pint glass will do just fine.
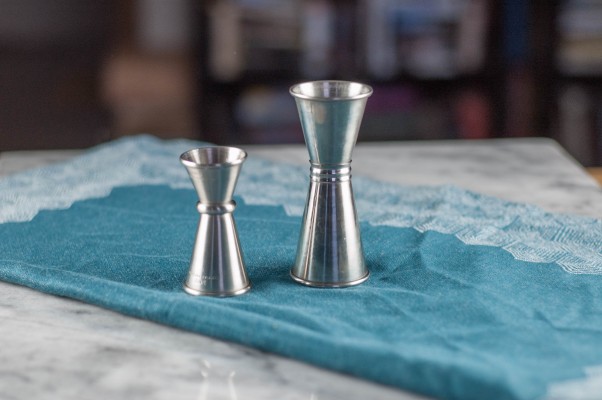
2. Jiggers. These are essential for measuring accurately and consistently. You could, theoretically, get by with measuring spoons (1 tablespoon equals half an ounce), but they’re tough to pour into and tip over easily. My favorite jiggers are these tall, narrow Japanese-style ones
made by Cocktail Kingdom. They come in 1 oz-2 oz and 1/2 oz-3/4 oz sizes, and the measurements are etched on, with marks halfway up the 1/2 oz to indicate where a 1/4 oz is, so there’s no guessing how much you’re pouring. They’re substantial enough that they don’t tip over easily, and again, they’re not that expensive. The combined cost of the two is $18.
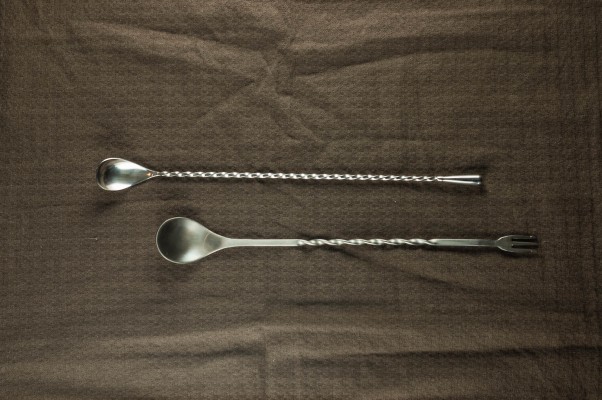
3. A bar spoon. You don’t really need a fancy glass for stirring drinks, but a fancy spoon is a different story. Bar spoons actually perform important functions. They are long and narrow enough to get to the bottom of the drink (something your average tea spoon isn’t going to be able to do), and their twisted design makes them much easier to rotate in the glass or mixing tin. This is a place where it’s worth splurging a little. The top one in the picture is a 30-centimeter one made by Cocktail Kingdom that’s perfectly balanced and feels nice in my hands, the bottom one is a cheapie I picked up when I was getting started and didn’t know what to look for, and it just feels flimsy and makes stirring a pain. The good one is $19, and it’s worth every penny.
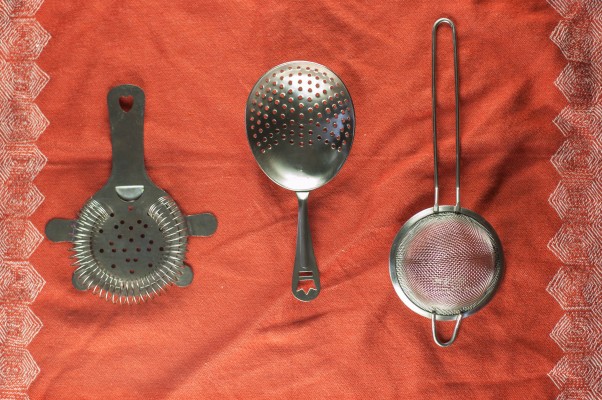
4. A strainer. A two-piece shaker doesn’t come with a built in strainer, which means you need a separate one to hold back the ice from your drink. For shaken drinks, you’ll want a Hawthorne strainer, which is the one on the left in the photo with the coiled spring attached to it. It’s designed to keep out not just ice, but also any bits of fruit pulp or herbs that you might have shaken with the cocktail. If you’re just going to buy one strainer, I’d start there, as it is the easiest to use. (Place the coil side down over your opened shaker and hold the strainer in place with your index finger as you pour the drink into the glass.) For stirred drinks, the traditional strainer is the julep strainer
, which is the middle one in the photo. Since (spoiler alert) stirred drinks are only spirits and ice with no herbs or fruit bits to strain out, the julep strainer is simpler, since it just needs to hold back the ice. You don’t need one, but their larger bowl shape makes them significantly easier to use if you’re using a wider mixing glass. They’re so cheap, and take up so little space, that it’s not a bad idea to pick one up if you’re interested. The third and final strainer that you might want to add to your bar set up is a mesh cocktail strainer
. It’s used when you want to double strain a shaken drink to really get rid of any little bits of fruit or herbs that might interfere with the texture of the drink. If you have a larger fine mesh strainer you can use that if you pour carefully. You could also strain a drink like that through some cheese cloth, but you can get a dedicated strainer pretty inexpensively if you want one.
5. A channel knife. You’ll need a channel knife for garnishing drinks with twists of lemon or lime or orange peel. I’m partial to this one from Rösle, which works for both lefties and righties and has a nice heft and a quality blade for carving out narrow spirals of citrus peel and pith. You can probably get away without one of these if you’re just starting out, but nothing else really works for this task, so if you get into cocktails you’re going to want one of these sooner or later.
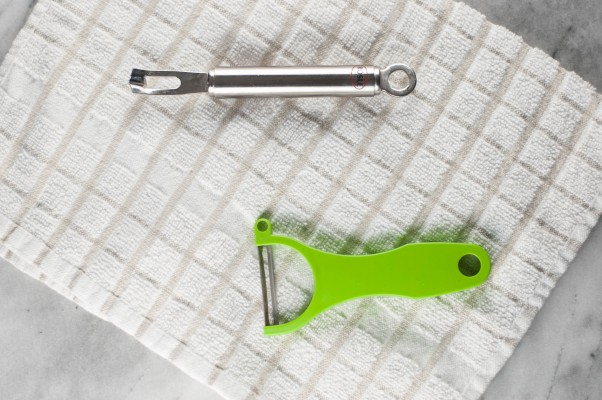
6. A Y peeler. You’ll need one of these for garnishing drinks with flat pieces of citrus peel. Unlike a channel knife which is good for pretty spirals, a Y peeler is good for getting thin flat pieces of peel off of citrus so you can squeeze the citrus oils over your drink. You can use a straight peeler if you have one, but the Y peeler is perfectly shaped for working with citrus fruits. My favorite is this one from Kuhn Rikon, and it’s only five bucks.
That equipment will get you started. You can always add more (we haven’t gotten to muddlers, specialty ice cube trays, atomizers, or glassware) if you really get going.
Cheers.
M
Sunday 15th of February 2015
Just the sort of info I've been waiting to have fall into my lap. Thanks!
Mary
Sunday 15th of February 2015
You're welcome!